How to Redirect an IP To a Domain and How to Configure Domain Redirects in cPanel
That title’s quite a mouthful, isn’t it? Before we dive right in explaining how you can get around both these processes, we should digress a bit and look at what they actually are.
Redirecting an IP to a Domain and the Benefits
Redirecting a new IP to a domain, in our context, refers to the addition of an internet protocol to an existing domain name. There are numerous reasons why anyone would want to configure their domain name to have two or more IP addresses. By creating multiple IPs, you can give every cPanel account a unique one that it can use to connect to the server.
Think of the domain as a secure vault room. When there is just one IP, it means that there is just one keycard that can be used to open the vault up. While multiple people will still be able to get access at any time, they will be fettered by the limited and single availability of just one card. However, by giving all the concerned personnel their own keys and passes, you’ll be able to make things quicker and easier.
That’s one way in which we can understand the advantages of redirecting new IP addresses to a domain.
We could go on about the benefits of static IPs as well, but let's keep it short and sweet.
Domain Redirects
Think of a large brand store located in a prime spot right in the middle of the shopping center. The store gets tons of visitors and is a pretty popular spot for all.
Now, due to some developments, the store has to move to another location. Before doing so, the store will erect a large sign outside their premises informing customers that from now on, their shop will be found at a so-and-so spot.
So, what does the store do? It redirects customers from an old location to a new one.
And that is pretty much what domain redirecting is as well. When a website moves from one domain to the other, it has to do something about all the visitors who are only aware of the old address. So, instead of completely ditching the latter, they set up domain redirects. Anyone who types in the old address will automatically be brought to the new domain.
A bit about domain status codes…
Status codes are sets of digits that a client sees/receives when it makes a request to the server. One of the most common and cliché status codes is the good old '404'; which means that the page was not found.
With domain redirecting, there are essentially two types of status codes that you should know about because they will be mentioned further on in this post.
-
301 redirect -
302 redirect
When setting up domain redirects, you can choose from between two of these (and others as well, but these two are the most common).
The 301 redirect means that the website the user is trying to access has been shifted to a new address permanently and indefinitely. Once the HTTP client knows that the shift is permanent, it will know that it has no use keeping the data pertaining to the old page in its cache. Hence, it will clear it up.
Using the same store example we mentioned above, we can give this status code a real-life illustration as well. If you go to the shop and find that it has only been temporarily moved to some new premises (so that the original place can be painted or repaired, or whatever), you won’t delete its location from your phone. Since you know that the change is temporary, the information stored on your phone will be useful in the future. But if you find that the location change is permanent, you will get rid of the details you had stored pertaining to the previous spot.
The former scenario in this example is what happens in the 302 redirects. This status code tells your client that it does not need to clear the cache because the domain change is not permanent.
How to Redirect an IP To a Domain using cPanel
That’s it for the chit-chat. Let’s get right into the stepwise tutorials on how you can do both the above processes using cPanel and WHM. Let’s start with IP redirection.
In this process, there are two phases or parts that you have to know about. One is the account creation, and the other is the IP change (where you can change an existing IP to the newly created one).
Creating a new IP
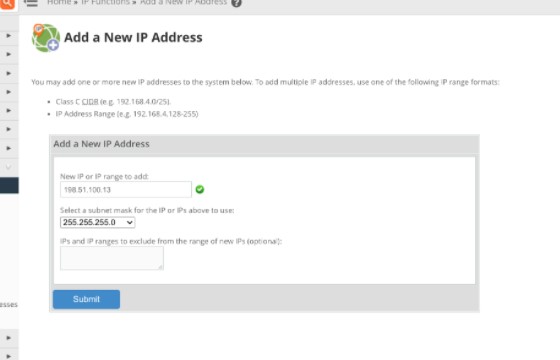
To add a new IP to your server, you need to first get one from your hosting provider. Once you have the new IP, you need to go over to WHM and click on the ‘IP functions’ menu in the left sidebar. In the drop-down, you will the ‘Add a New IP Address’ option right at the top. Here is the screen you should get after selecting the option:

In this window, go ahead and type out the newly acquired IP and the subnet mask. You can refer to your hosting provider for details on the subnet mask if you are not sure which one to enter. Afterward, press 'Submit'.
And that is how you add an IP to your domain using WHM. You can, later on, link the newly added IP to a user account or a website.
Changing existing IP’s
You can also change the IP address on a website, instead of adding a new one. This you can do by going to the List Accounts option and clicking on Account Information.
Here, you will see a list of the various domains that are under your control. You can select the one where you need to implement the changes (viz., the IP) and click on the blue ‘Change IP Address’ button listed under ‘Actions’.
How to Configure Domain Redirects
And that’s it as far as IP redirects go. Now, let’s look at how you can configure your domain redirects. The process is very simple. Here we go:
Go to the ‘Domains’ setting and click on ‘Redirects’. Should be something like this:

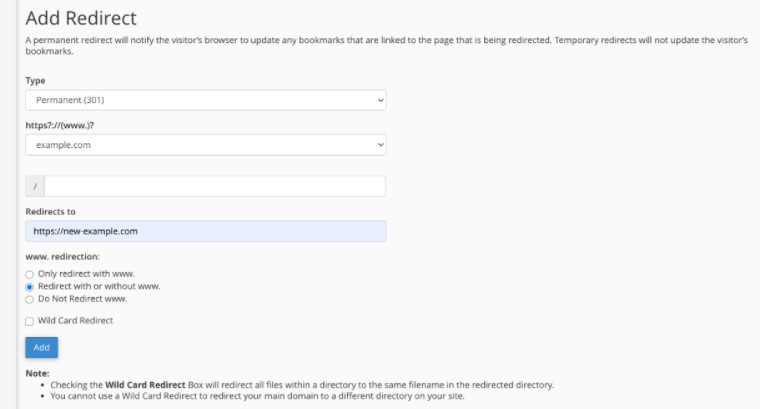
Once you click on the option, you will see this screen appear.

Let’s look at what you have to do in each of the fields.
In the first field, you have to choose the ‘Type’ of the redirect. Above, we looked at the 301 and 302 status codes. Here is where you will need to specify whether your website has been shifted to the new address permanently or temporarily. You can pick 301 for permanent, and 302 for temporary.
In the next field, go ahead and enter the name of the old domain viz., the one where visitors will be redirected from. In the field below this one, you’ll see a ‘/’ sign. This is used when you want to set up redirects for a specific page within a website, and not the whole domain.
In the field marked ‘Redirects to’, you have to enter the address of the new website viz. the one where visitors will be redirected to.
Below are some additional options that you use if you need/want to. But the main and necessary part of the process is the one we discussed above.
Conclusion
One of the most awesome things about cPanel is that it makes things really easy and simple for the users. The processes we discussed above, if done manually, can be very arduous and time-taking. But, with cPanel, all you have to do is follow the mentioned steps, and you’ll be good to go.
Updated 7 months ago