How to Debug WordPress® with cPanel and WordPress Toolkit?

Developing a WordPress website is an exciting experience. Most users admire its simplicity, and you don't have to write a code for every operation. However, you can write code using languages like PHP if you want.
This gives the user more flexibility. If you are familiar with WordPress sites, you probably know that most of its operations revolve around plugins, themes, and updates. However, most users like to develop new plugins, and sometimes they tweak the themes for better performance and appearance.
So, when you develop a website using WordPress, you might have to create several plugins, custom functions, and themes. This might cause some errors in WordPress Code. Also, applying updates can cause some issues for the WordPress code. That is why today we will talk about how to debug WordPress® with cPanel and WordPress toolkit.
What is WordPress Debugging?
As mentioned in the above section, your WordPress site might generate some errors during the development. So, discovering them and fixing those errors is a must. For finding errors, debugging can help you a lot.
Because Debugging helps you determine if your WordPress website is causing any errors. WordPress has several built-in debugging tools but using those tools can be a little difficult and time-consuming. You must turn on these built-in debugging tools to use them. Because by default, they are turned off.
But, today, we are not going to talk about these built-in debugging tools. Instead, we will use the cPanel's WordPress Toolkit.
Note: Always remember one thing, you shouldn't turn on the above-mentioned debugging mode on a live site. Use it before publishing your website.
Before starting the main topic, we need to discuss a few other things. The WordPress code is mostly written in PHP language. So most of the plugins and themes are written in PHP.
Debug Your WordPress Site with cPanel and WordPress Toolkit
Using cPanel's WordPress Toolkit to identify errors is fast and convenient. We will talk about this process in three different sub-topics.
- Activate and configure the WP debugging mode
- Determine faulty plugins
- Activate and customize the WP maintenance mode
Activate and configure the WP Debugging Mode
This is the first step in this debugging process; WordPress debugging mode informs the software about log errors and wrong PHP codes. The error log can help you find the reasons for unexpected behaviors.
As mentioned earlier, debugging mode is usually turned off. So, it would help if you turned on the debug mode.
Step 01 – Log in to your cPanel account. Click the WordPress Toolkit button. It should be under the Domains tab.
Step 02 – After that, the WordPress Toolkit window will open. Select the site you want to execute the debugging.
Step 03 – In here, you can turn on the debugging mode. But before that, we need to configure it. There are several options available for you to configure and click the Debug Settings icon located near the Debugging button.
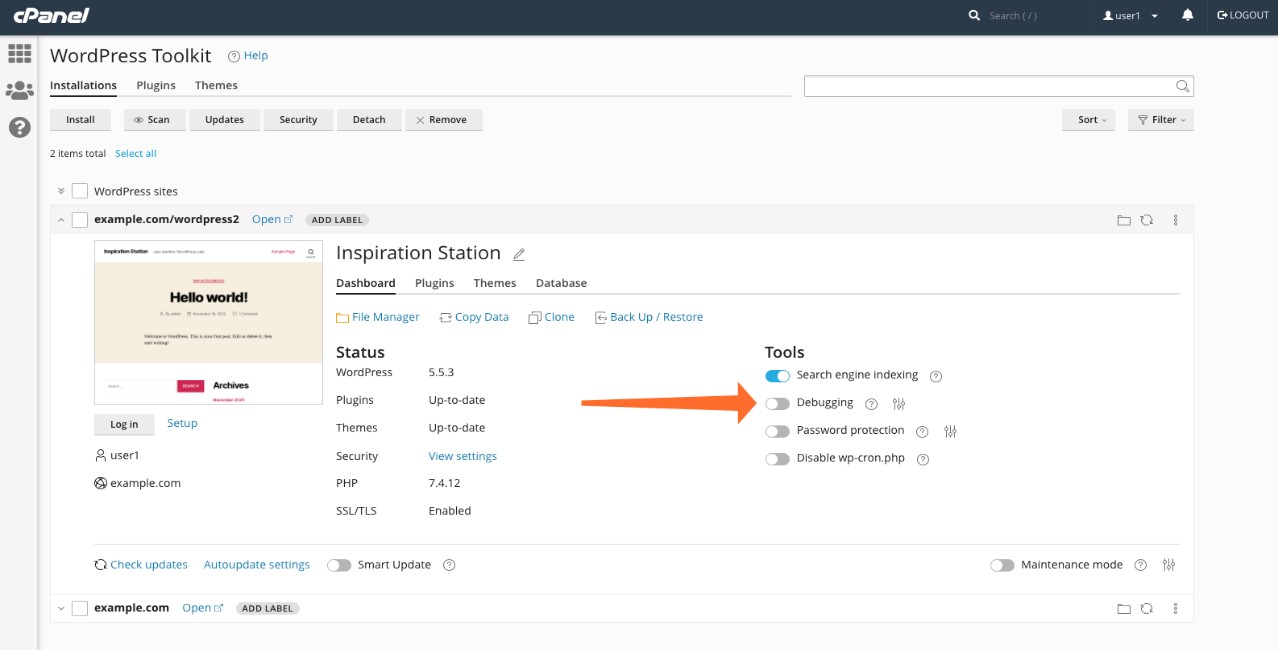
Image courtesy - https://blog.cpanel.com/wordpress-debugging-with-cpanel-and-wordpress-toolkit/
Available Option for Debug Settings
There are five different options in the Debug Setting windows, and you should configure these options accordingly. So, let's check them out.
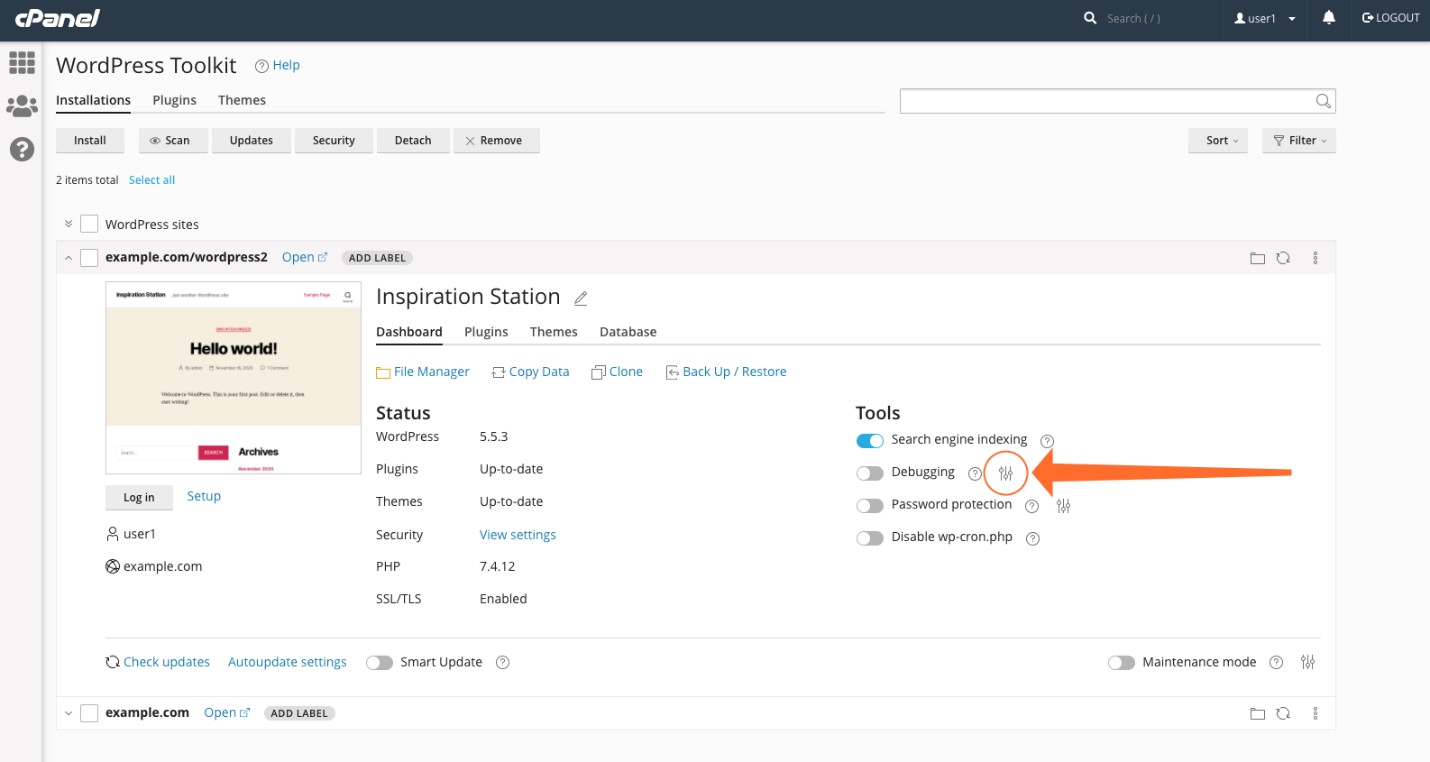
Image courtesy - https://blog.cpanel.com/wordpress-debugging-with-cpanel-and-wordpress-toolkit/
-
WP_DEBUG – This option turns on and off the WP debugging mode.
-
WP_DEBUG_LOG – It informs WordPress to note down error messages. So, all the error messages will be written in the debug.log file. You can find this debug.log file in the wp-content directory.
-
WP_DEBUG_DISPLAY – This will give you the options to turn on and off the error message alerts. So, depending on the situation, you can select the preferred option. For instance, if your site is in the development stage, it is better to turn off this option. On the other hand, if your site is in the production stage, you should turn off the WP_DEBUG_DISPLAY.
-
SCRIPT_DEBUG – Finding bugs in front-end code is never easy. So, this option allows you to use JavaScript and CSS to find those bugs.
-
SAVEQUERIES – This option can save several database queries to any PHP array. These queries will display on the webpage or at the beginning of your code. But remember, activating the SAVEQUERIES option will affect your site's performance. So, make sure to turn it off after the debugging.
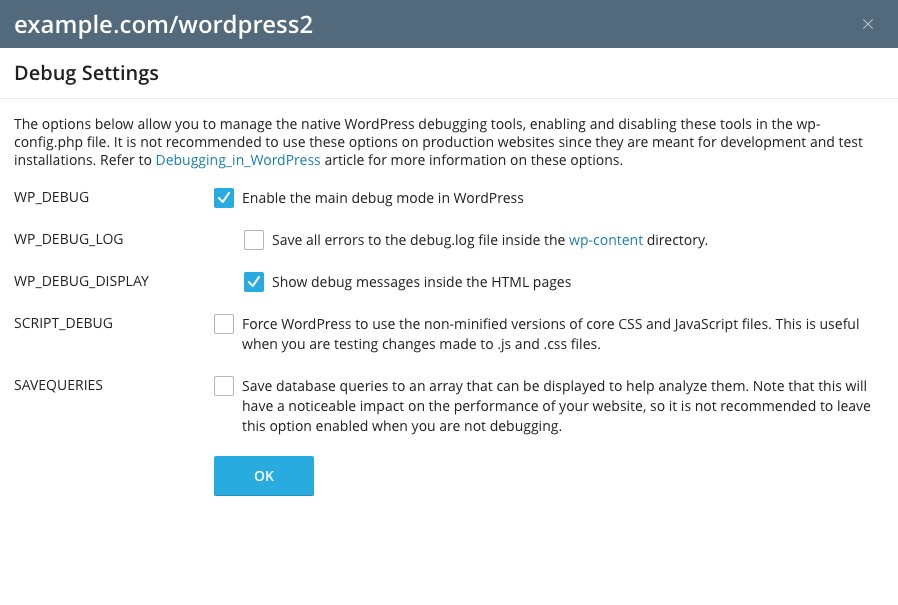
Image courtesy - https://blog.cpanel.com/wordpress-debugging-with-cpanel-and-wordpress-toolkit/
Step 04 - After selecting the necessary debugging options, click the OK button. Now WordPress will start to debug errors. You can view these errors from the wp-content directory (go to debug.log file).
Determine Faulty Plugins
Reading and fixing PHP code errors is not an easy task. If you have good PHP programming knowledge, fixing PHP errors won't be a problem. But most users lack this skill. So, instead of reading and fixing PHP errors, there is an easy method that you can follow quickly.
Step 01 – First, identify the trouble-causing plugins. You can complete this task by the process of elimination.
Step 02 – Click on the WordPress Toolkit button on the cPanel. Then go to the Plugins tab. Here, you will find all the plugins that your WordPress site uses.
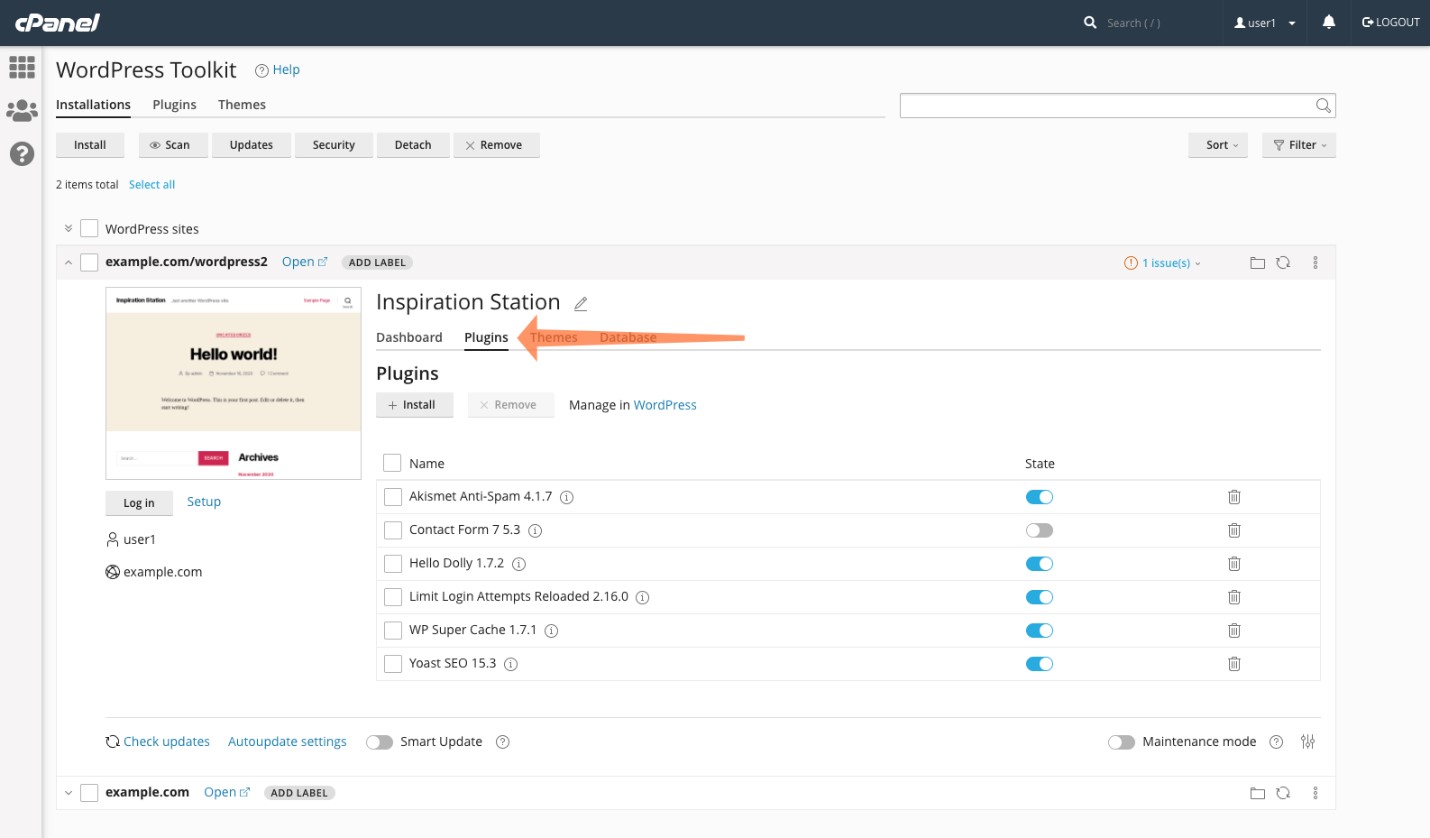
Image courtesy - https://blog.cpanel.com/wordpress-debugging-with-cpanel-and-wordpress-toolkit/
Step 03 – In the Plugins tab, you can find a switch to activate or deactivate the plugins. So, deactivate the trouble-causing plugins.
Step 04 - Then check debug.log. If the error message is not displaying on the debug.log file, your problem is fixed. Now uninstall the plugins.
Activate and customizing the WP Maintenance Mode
Using debugging mode with a live site is not recommended. But what happens when you notice a bug in a live site?
You need to combine the WP maintenance mode and debugging mode in this situation. The maintenance mode will display a message to your user notifying them that the site is currently not available.
Step 01 – Click the WordPress Toolkit button. Then select the site. After that, switch on the maintenance mode. Also, you can customize the maintenance mode using the configuration icon.
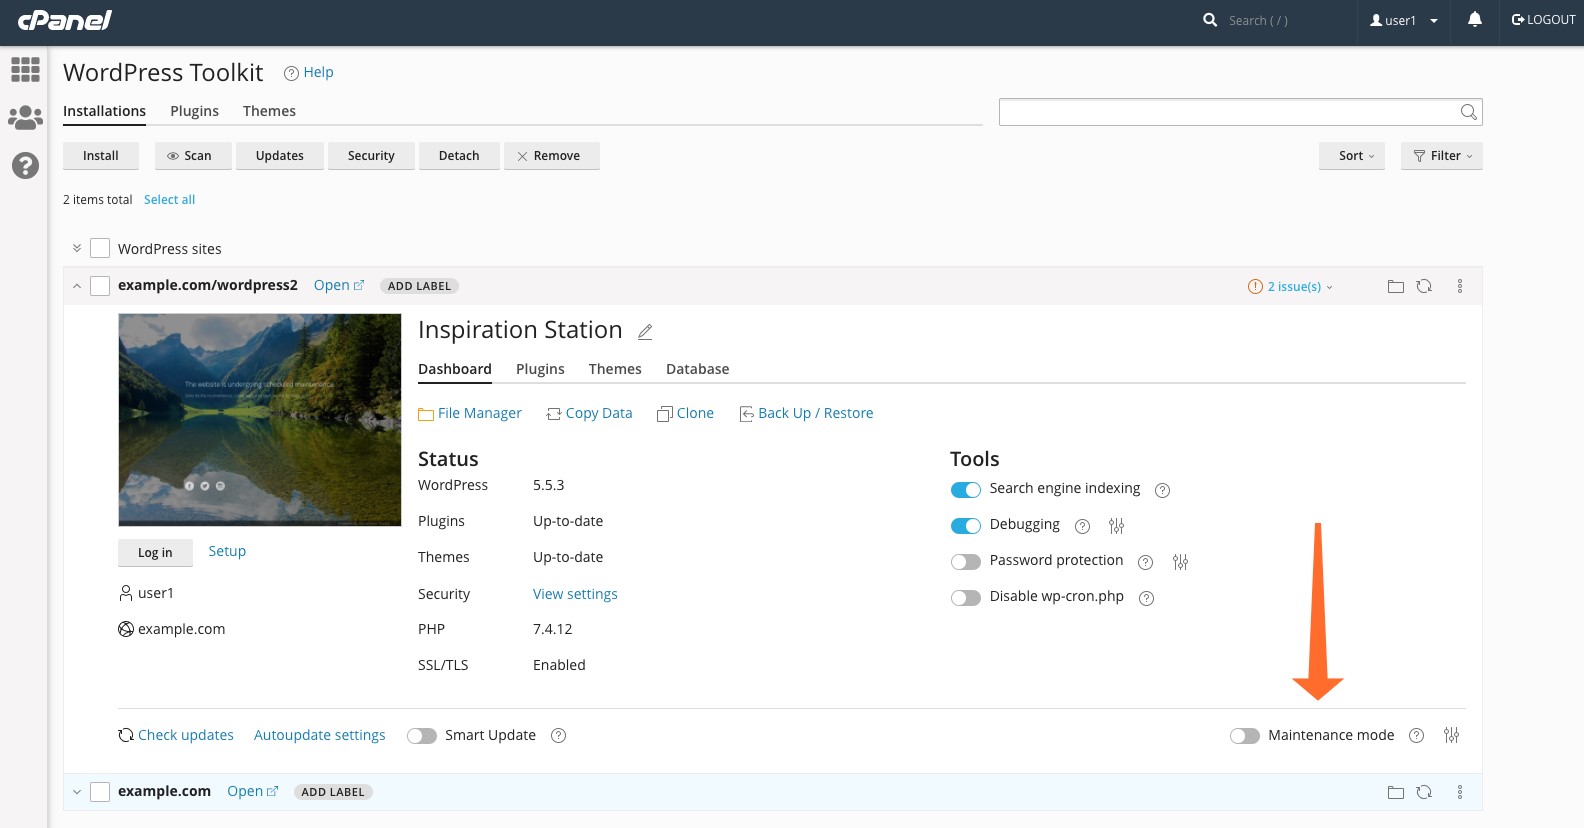
Image courtesy - https://blog.cpanel.com/wordpress-debugging-with-cpanel-and-wordpress-toolkit/
Step 02 - Then, click the Backup/Restore button to restore your WP site to a bug-free version; this is the easiest way to fix bugs on a live site.
Wrap up
We hope that now, you know how to debug WordPress® with cPanel and WordPress toolkit. Whether you deal with a development site or a production site, you can get the job done effectively.
Updated 9 months ago