How to Host Dynamic DNS Domains with cPanel?
For any web hosting process, you need a control panel. cPanel is one of the reliable control panels for web hosting, and it is a software developed by cPanel, LLC. This control panel provides you with a graphical interface and the necessary automation tools. You can use these automation tools to simplify the web hosting process.
Hosting a website is not an easy task. So, proper use of the cPanel can make your life much easier. But, our topic is not about cPanel. Right?
Don't worry about that. Before starting the main topic, we need to clear some things first. So, first, we will talk about dynamic DNS and then how to host Dynamic DNS domains with cPanel.
Difference Between DNS and DDNS
Usually, DNS can transform a web address into an IP address. For instance, if you type www.youtube.com into your web browser, DNS will find the corresponding IP address and transform it into a domain name. In this example, www.youtube.com, the DNS database uses a static IP address. That means this IP address is not changing. If the www.youtube.com IP address changes, you will not access the site. Therefore, most websites, companies, and organizations use static IP addresses.
On the other hand, Dynamic DNS uses dynamic IP addresses. That means the IP address will change regularly. The best example of this is the home IP address. Normally, home computers get dynamic IP addresses.
How Does the DDNS Work?
We hope that now you have a better idea about the DDNS from the above section. But, how does it work?
DDNS will allow you to access the home computer even after your home IP address changes; DDNS will create a custom hostname for your home computer. And this custom hostname will link to your IP address. Even if the IP address changes from time to time, DDNS will update the new IP address to your custom hostname. So, with a DDNS, you can access your home computer from your office computer.
How Do I Host Dynamic DNS Domains with cPanel?
If you follow the above sections, you will have a good understanding of how the DDNS works. This section will talk about how to host a Dynamic DNS domain with cPanel. And remember one thing, don't get confused with Dynamic DNS domain and custom hostname; both are the same. For the sake of the article, we will use a dynamic DNS domain and don't mind that. So, without wasting much time, let's start our main topic.
Create a New DDNS Domain Using cPanel
This is the first part of creating a DDNS Domain. After this part, we will talk about how to configure the router.
Step 01 - First, we need to set up the subdomain. So, sign in to your cPanel account.
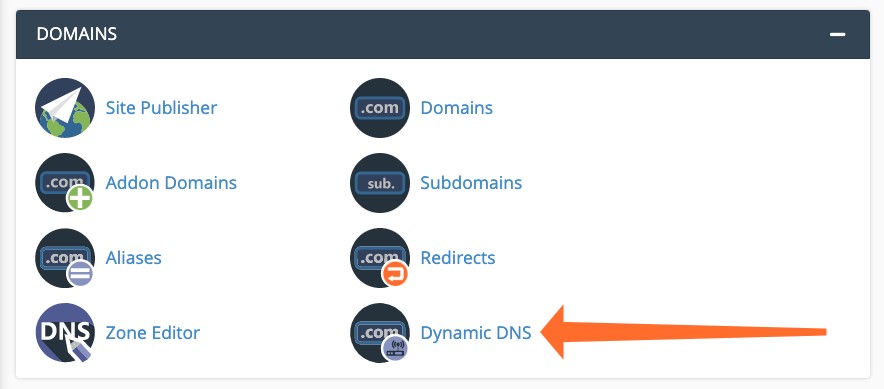
Step 02 - After that, find the Dynamic DNS button, and it should be close to the Zone Editor button. Click the Dynamic DNS button.

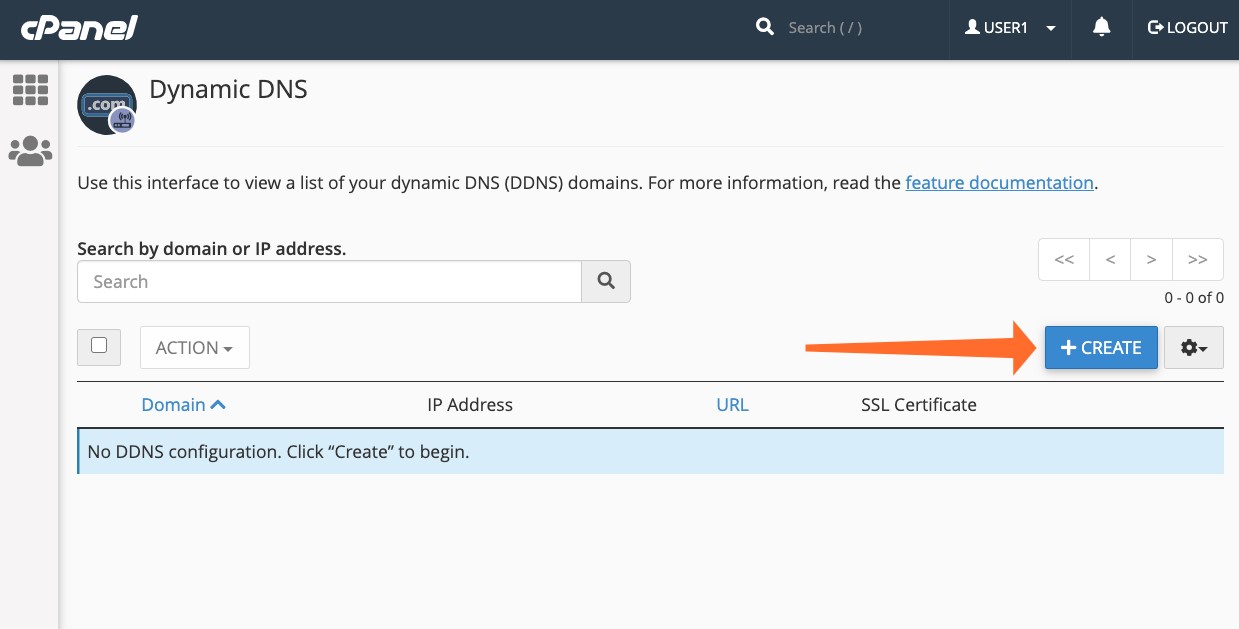
Step 03 - A window will appear labeled as Dynamic DNS. Click the Create button in that window.

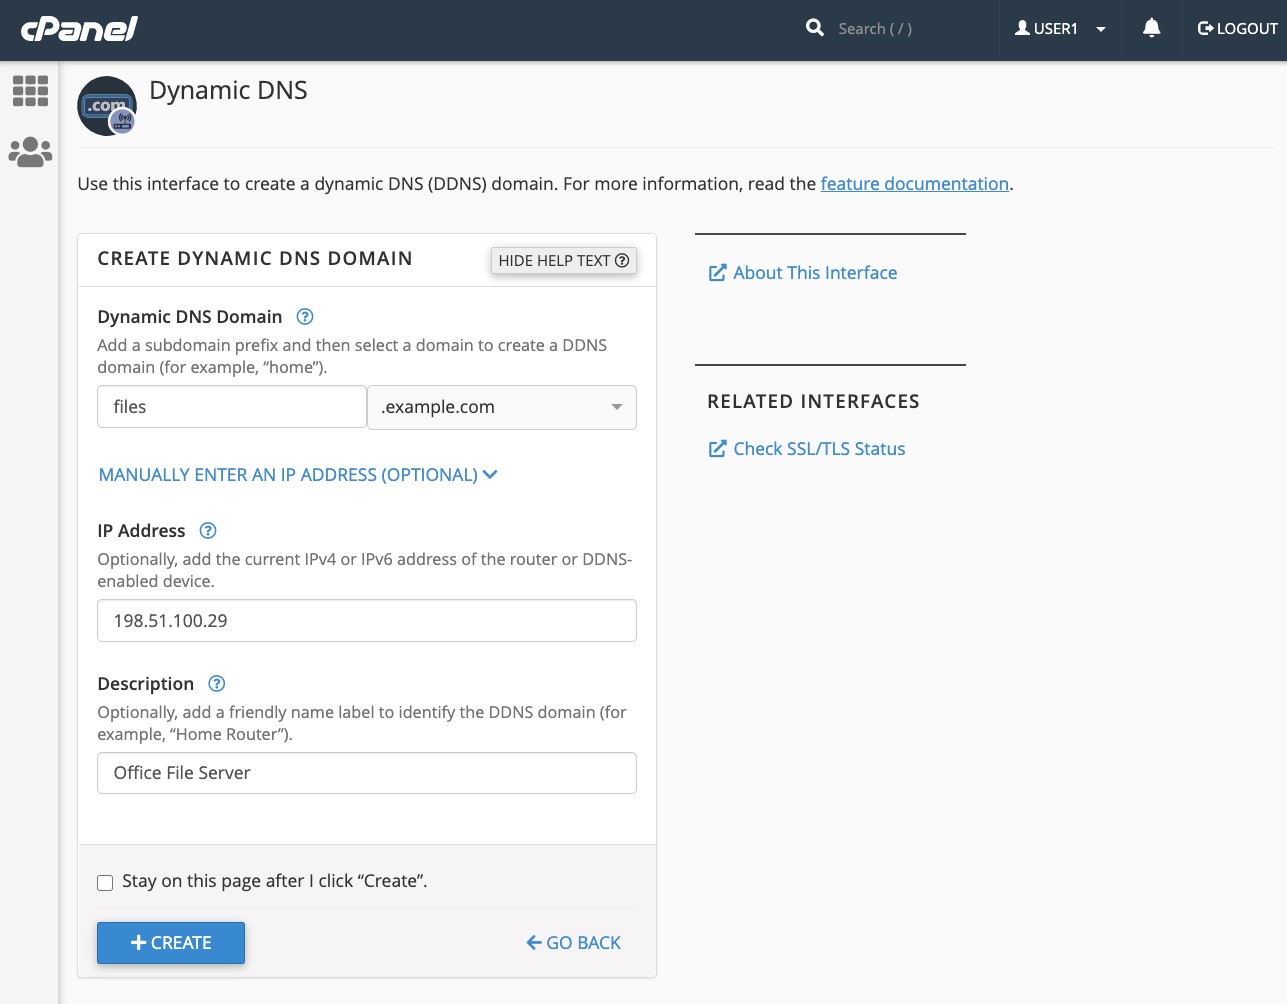
Step 04 - Now, you need to enter the name of your subdomain. For instance, you can create a subdomain for your business or home files. After creating a subdomain, you can access your home or office files from any location. For this example, we will use the "files" subdomain.

Step 05 - You need to provide the current IP address; this is a one-time procedure. After successfully executing the DDNS, the system will automatically update the IP address. We talked about this in the How Does the DDNS Work section.
Step 06 - Now, give the domain name. Type Home File server or Office File Server. Or any other name.
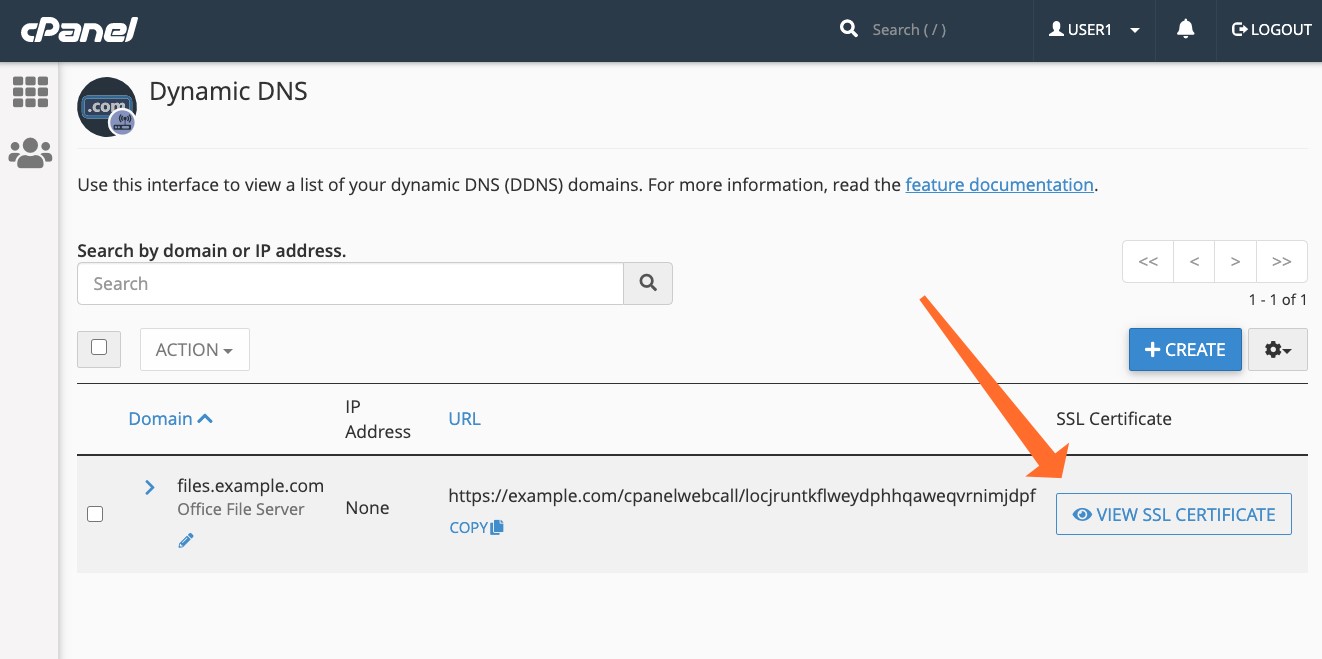
Step 07 - Finally, click on the Create button. Now, cPanel will create a subdomain. And it will also generate a unique URL. This unique URL is known as a web call.
Note - Your router or server will use this web call address to notify of IP changes to the cPanel.
Configure the Router for DDNS
If you follow the above step correctly, now you are very close to hosting a Dynamic DNS domain with cPanel. In this section, we will talk about the router configuration for DDNS.
For every router, DDNS client, or firewall, there is a different method for configuring DDNS domains.
Most time, you will have to execute the following processes.
- You have to identify your router's Dynamic DNS interface.
- Then, you need to select a DDNS provider.
Then you have to provide the SSL certificate. Providing an SSL certificate will enable your device to connect through an encrypted connection. Click the VIEW SSL CERTIFICATE button on the Dynamic DNS window to open SSL certificate details.

SSL Certificate - It is a bit of code that runs on the web browser. This SSL certificate provides much-needed security for online communication. Whenever a web browser tries to contact your website, the SSL certificate immediately enables the encrypted connection.
If you follow the above steps correctly, you can configure your router correctly. After this process, the router will https://blog.cpanel.com/how-to-host-dynamic-dns-domains-with-cpanel/#:~:text=Create%20a%20New%20DDNS%20Domain%20in%20cPanel&text=Log%20in%20to%20your%20cPanel,managed%20by%20your%20cPanel%20account
use a web call URL to notify the cPanel when its IP address changes.
Note - Sometimes, configuring your router can be tricky; Because the configuring process might change from router to router. So, you might have to find the software documentation for your router, and you can find this documentation on the Internet.
So if you ever get into trouble, make sure to do some research. A bit of extra knowledge is always better.
Wrap Up
We hope that, with this article, you were able to gather some important knowledge when it comes to DDNS domains. If you follow this article properly, you know about DNS and DDNS, static IP, and dynamic IP. And most importantly, now you have a proper understanding of how to host a Dynamic DNS domain with cPanel.
So, next time you want to connect to your home computer from the office computer, you know the process. And remember, make sure to practice this process one or two times.
Updated 9 months ago