How To Clone A Website In cPanel
There can be many reasons you'd want to know how to clone a website in cPanel. But before we tell you the process, we would like to acquaint you with some basic terminology to understand the process well.
What is a cloned website?
Cloning a website implies creating an exact replica or duplicate of a site hosted on your server. The newly cloned website will have identical files and database contents compared to the original one. However, what differentiates the clone from the original website is that the clone is hosted on a different domain or directory.
Why do you need to clone a website?
There can be several reasons for cloning a website. Some of these are:
- Deploying a testing or staging site:
If you want to build a new site, you can either start from scratch or use an existing site as a starting point and build upon it. If your new website is ultimately just for testing purposes, you might want to quickly clone it and test it rather than build it fresh.
- Setting up the new site with a basic configuration:
While building your first website, you have already spent some time figuring out the best configuration. Why not use the same for your new website rather reconfiguring it from scratch? This works even for non-testing sites.
- Providing designers and developers a live-like working environment:
Some functions can only be previewed in the live version. Therefore, if your new website is live while you are still working on it, then you can get things right in the first go. This saves a lot of testing and rectifying the error time.
Now that it is clear that cloning a website is a helpful process in many cases, the question arises why you should clone using cPanel.
Why should you clone your website using cPanel?
There are several tools to accomplish website cloning. Command line is one such tool; however, it is error-prone and time-consuming
cPanel allows you to automate certain steps where chances of making mistakes are high and the impacts are disastrous. Also, automation enables you to reduce cloning time, making the whole cloning process seamless.
How to clone your website using cPanel?
Knowing that cPanel is an easier and faster tool, it is crucial to understand how to clone websites using it. We will cover two methods of website cloning using cPanel:
- WordPress Toolkit method: This is a WordPress-specific method and is quick and easy
- The manual cloning method: This works for CMS & eCommerce sites, whether built on or not built on WordPress
WordPress Toolkit Method of cloning your website
Starting with the easiest and fastest method, the WordPress Toolkit method is somewhat automatic and uses the built-in tools to clone the website.
Step-by-step Process of cloning the website using WordPress Toolkit
Follow the below steps to clone your website:
- Open WordPress Toolkit
- Locate the site needed to be copied
- Expand to detailed view
- Click clone
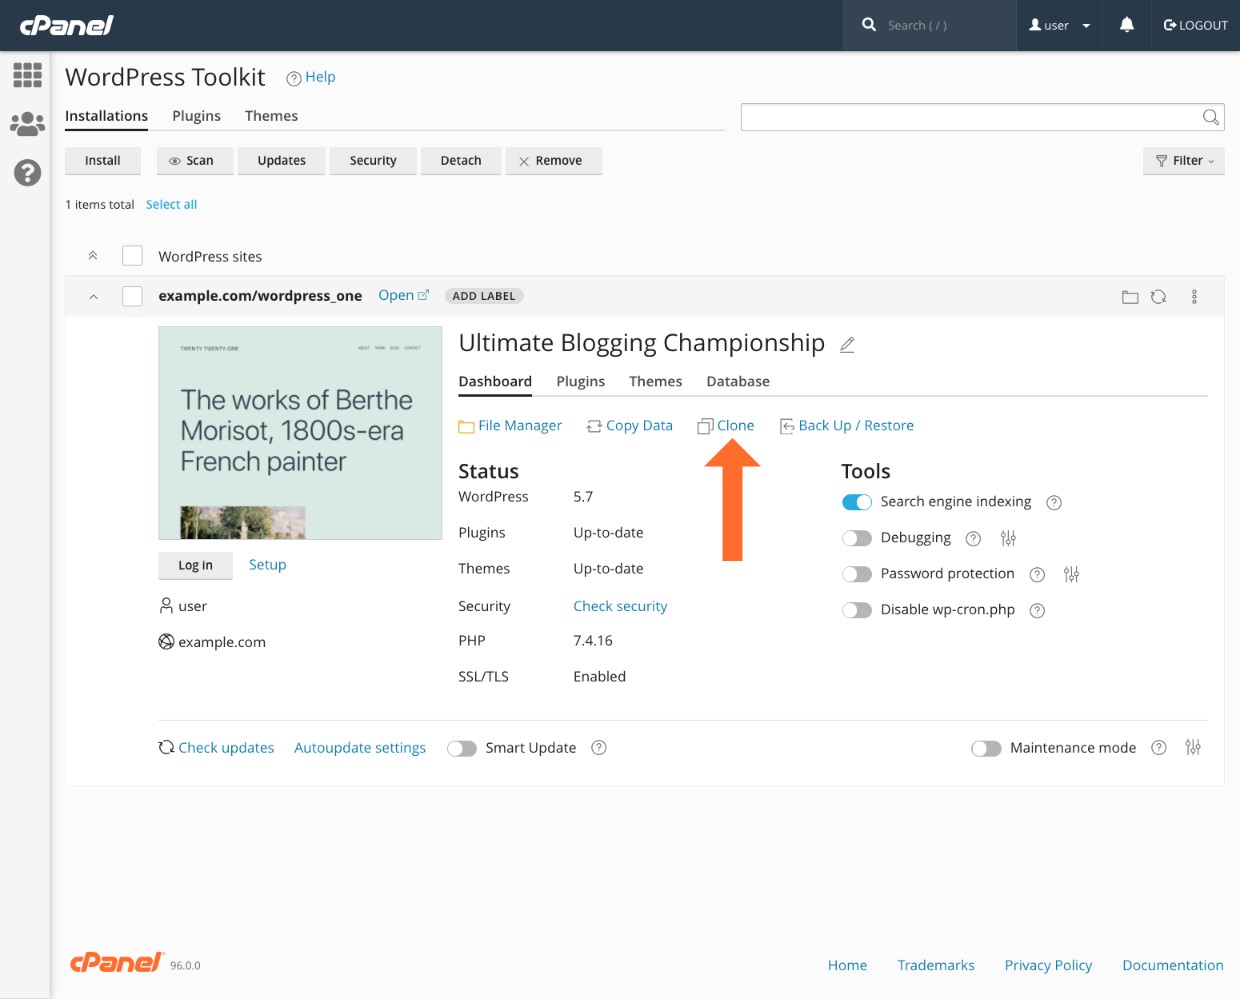
When you click the clone button, the clone tool will open. Follow the below steps from here on:
- Select the subdomain and path where you want to clone the website to
Note: If the path and subdomain don’t exist, WordPress Toolkit will create new ones - Start cloning by clicking the button at the bottom of the page
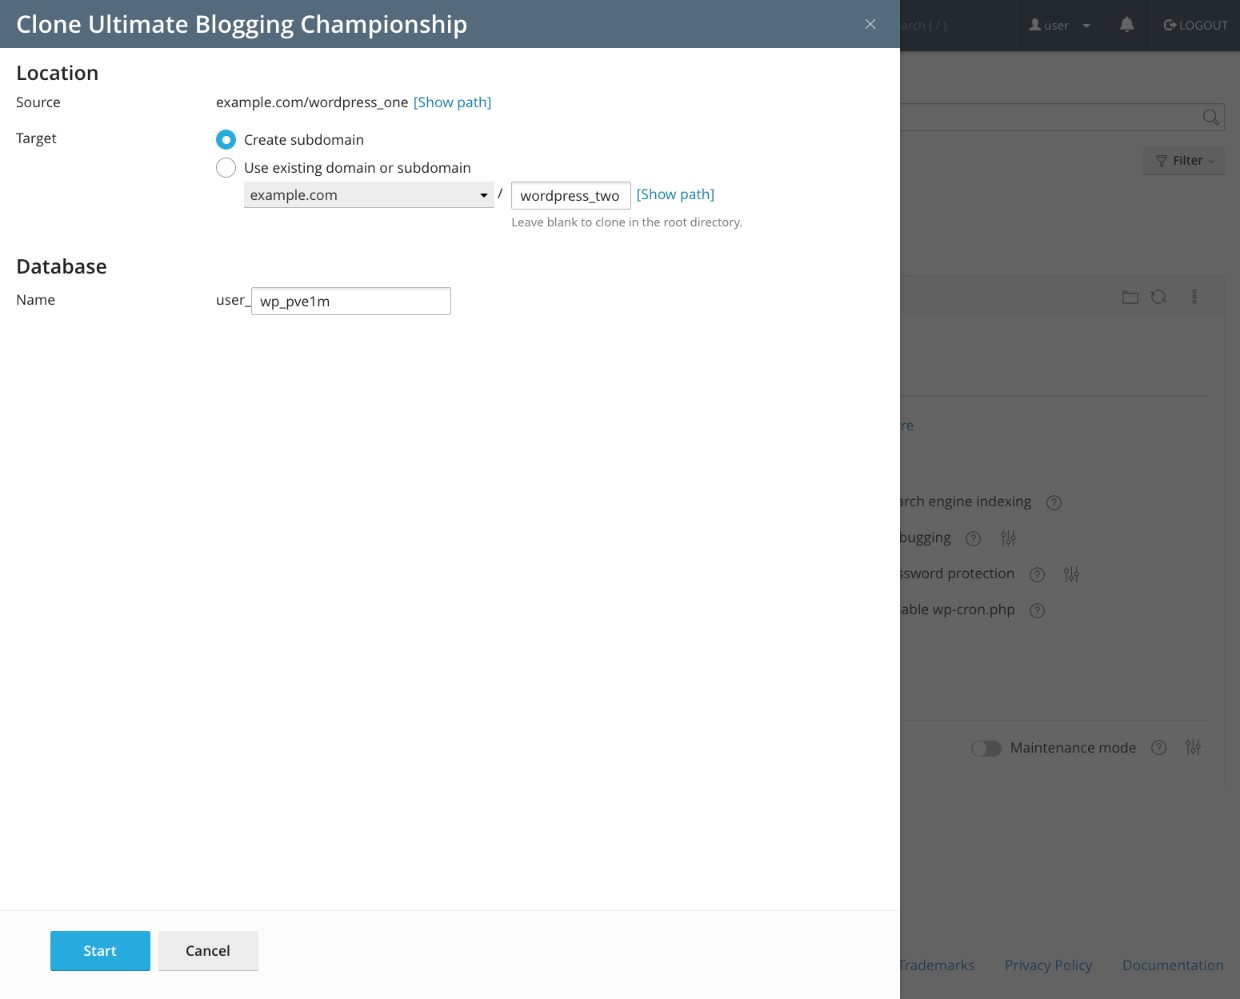
The benefit of using this method is that it is very simple. At the end of the closing process, along with the cloned site, you will get a new database and database user. Also, the site will be automatically configured to use the newly created database.
However, if your website is not powered by WordPress then you need to know the manual method of cloning too. Although it works on WordPress websites too, but is mostly used for non-WordPress website cloning.
Manual Cloning Method of cloning your website using cPanel
When using the toolkit method, you don’t need to worry about various components of your website. Everything gets copied automatically. However, if you are copying the website manually, you need to have a little bit of background knowledge.
Any website built on WordPress, Joomla, or Drupal CMS has two types of files that need to be copied over:
- The PHP code files
- Static files stored in the site's database, including images, JavaScript files, and CSS
Follow the below process to copy both sets of files to clone your website:
Step-by-step Process of cloning the website using manual method
The manual process is further subdivided into several parts:
1. Create the new directory for the new website
a. Go to the files section of the cPanel main menu
b. Create and name a new folder where all the files in the file manager will be copied
2. Copy original site’s content to the new directory
a. Select the site-to-be-cloned directory
b. Click Copy in the toolbar
c. Enter the name of the folder created in step 1
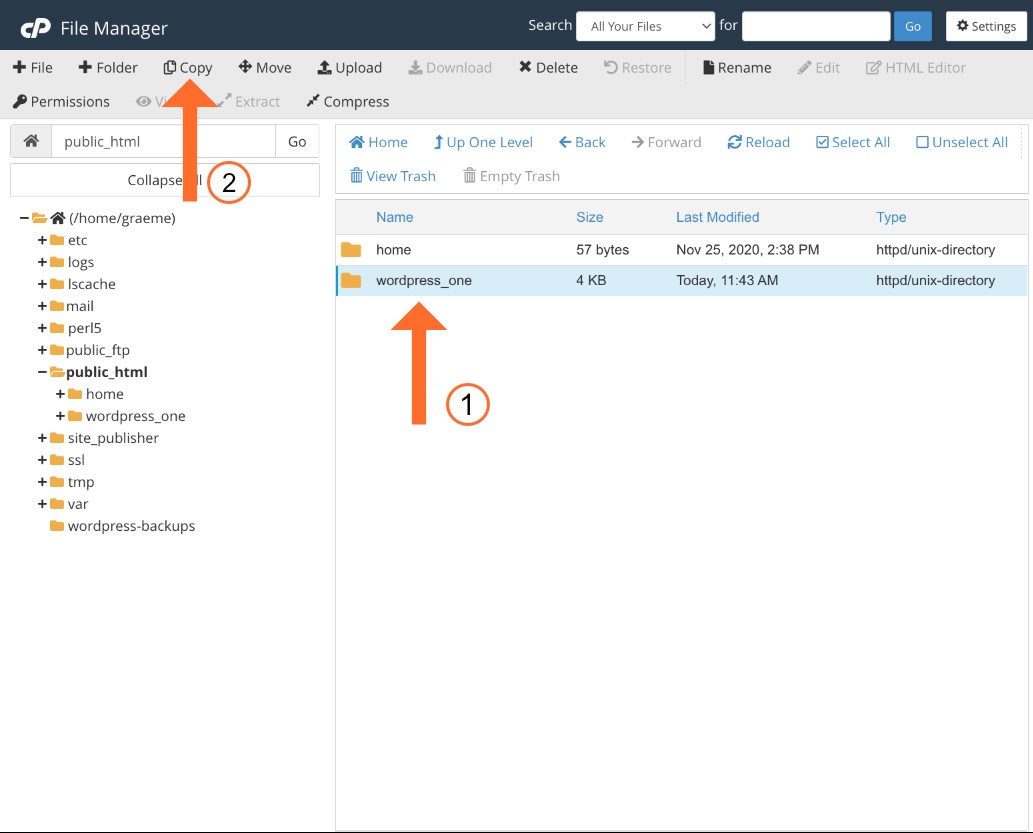
The above steps copy the original site’s directory content to the new folder. However, the databases still need to be copied over.
Copy over databases to the new website
For copying over the databases, you need to follow the below process:
1. Create a new database using the MySQL tools from cPanel
a. Go to database main menu
b. Open MySQL Databases
c. Give your new database a name
d. Click the Create Database button
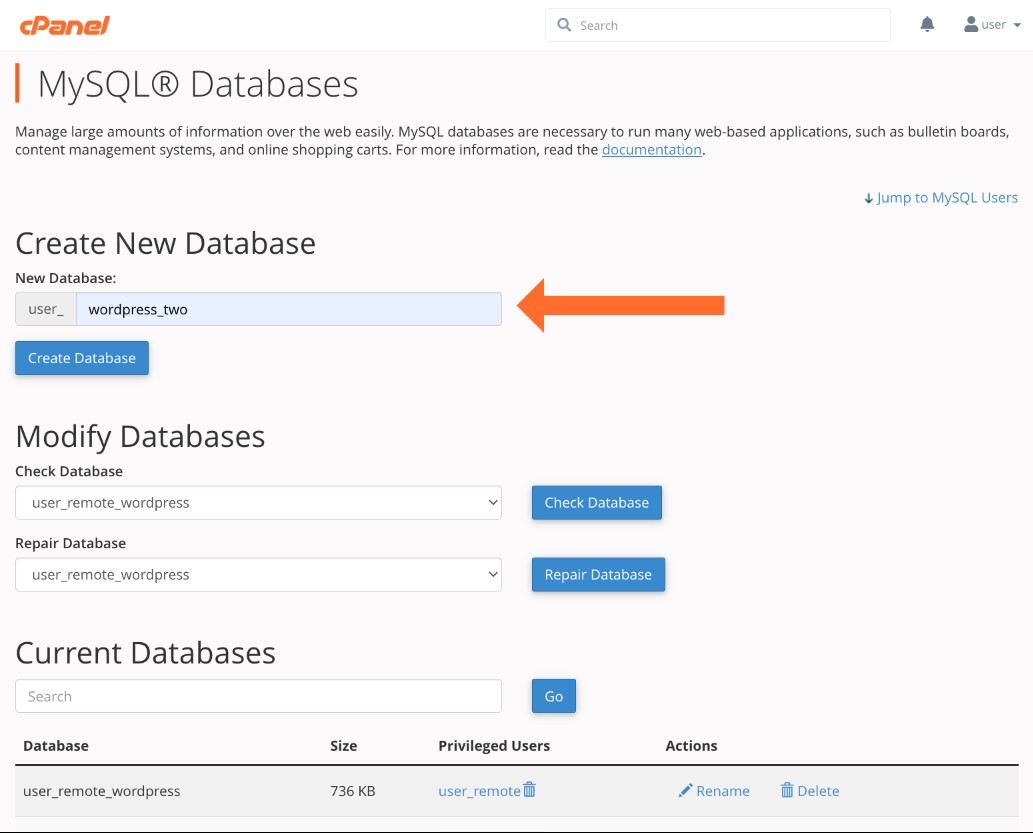
2. Export the original site’s database
a. Go to database main menu
b. Open phpMyAdmin
c. Select the database to be copied over from the left sidebar
d. Select the Export tab
e. Select quick export method
f. Click Go.
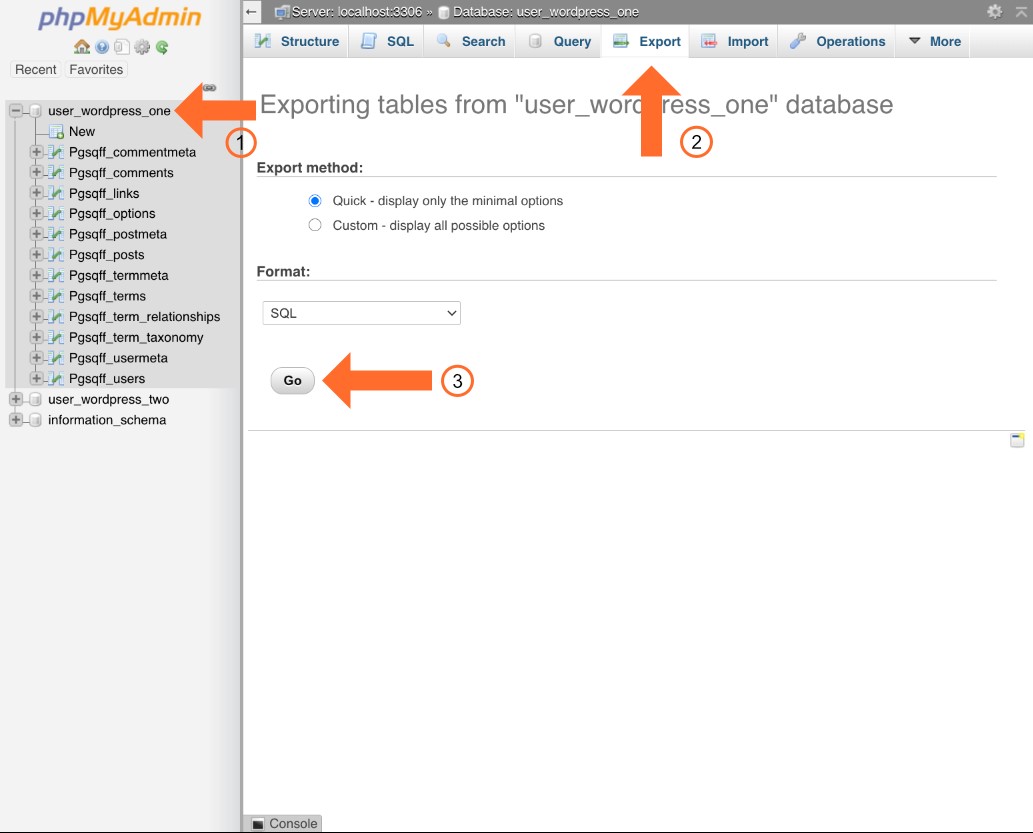
The original site's database is "dumped," and an SQL file is downloaded on your local machine. This database contains the information you will need to recreate the original site’s database.
Follow the below steps to recreate the original site’s database:
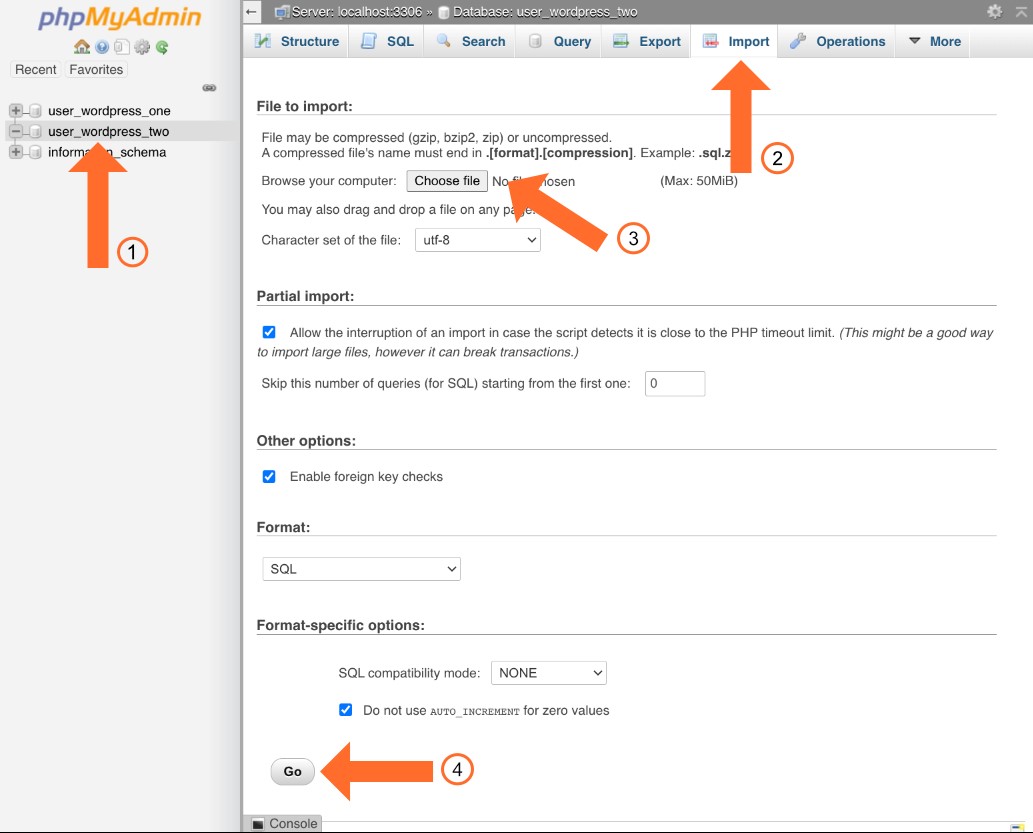
3. Export the original site’s database
a. Go to database main menu
b. Open phpMyAdmin
c. Select the new database created in step 6
d. Select the Import tab
e. Click on choose file to import
f. Select SQL file downloaded in step 7
g. Click Go
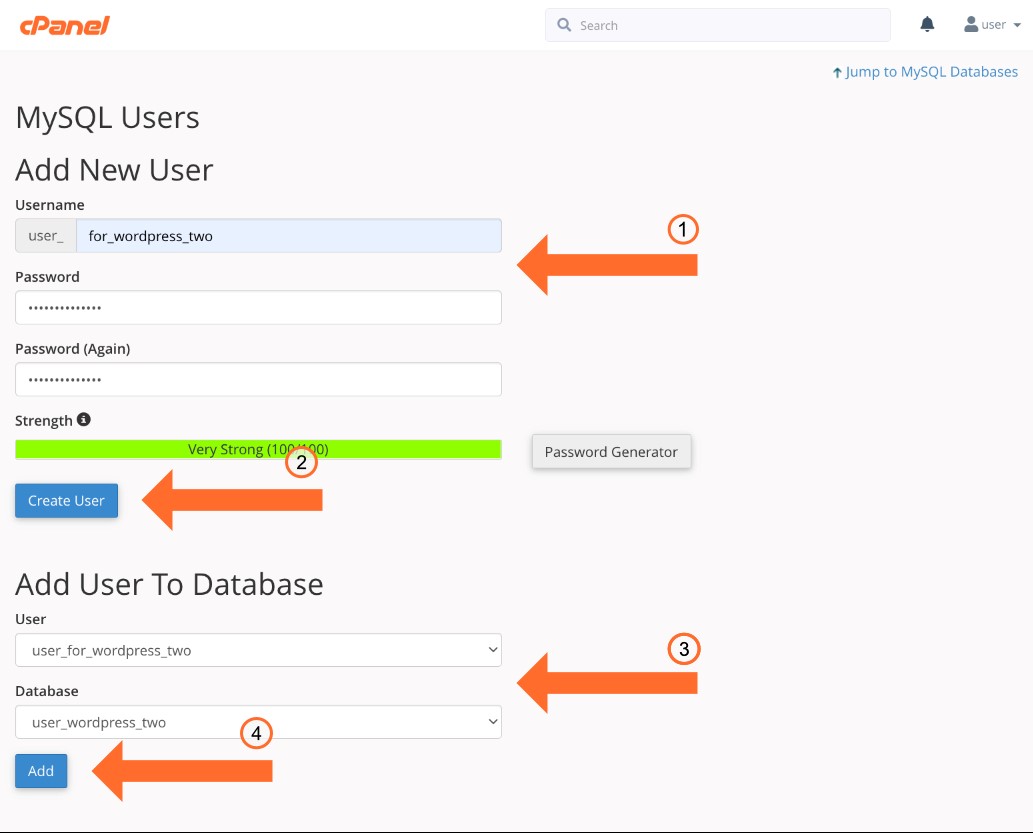
You can access the database through the existing user or assign a new user. To assign a new user, follow the below steps:
Go to MySQL Databases page
a. Scroll to the Add New User section
b. Create a new username and a strong password
c. Click Create User
d. Return to MySQL Databases page
e. Fill out the new user and new database details in Add User to the Database section
f. Click add
g. Select “All Privileges” on the next page
h. Confirm the changes
This completes the copying over process, but the cloned still uses the old site’s database. We need to change that and configure it on the newly created database.
Configure the new website’s database
Follow the below steps for a WordPress site, but for other sites, the process is quite similar:
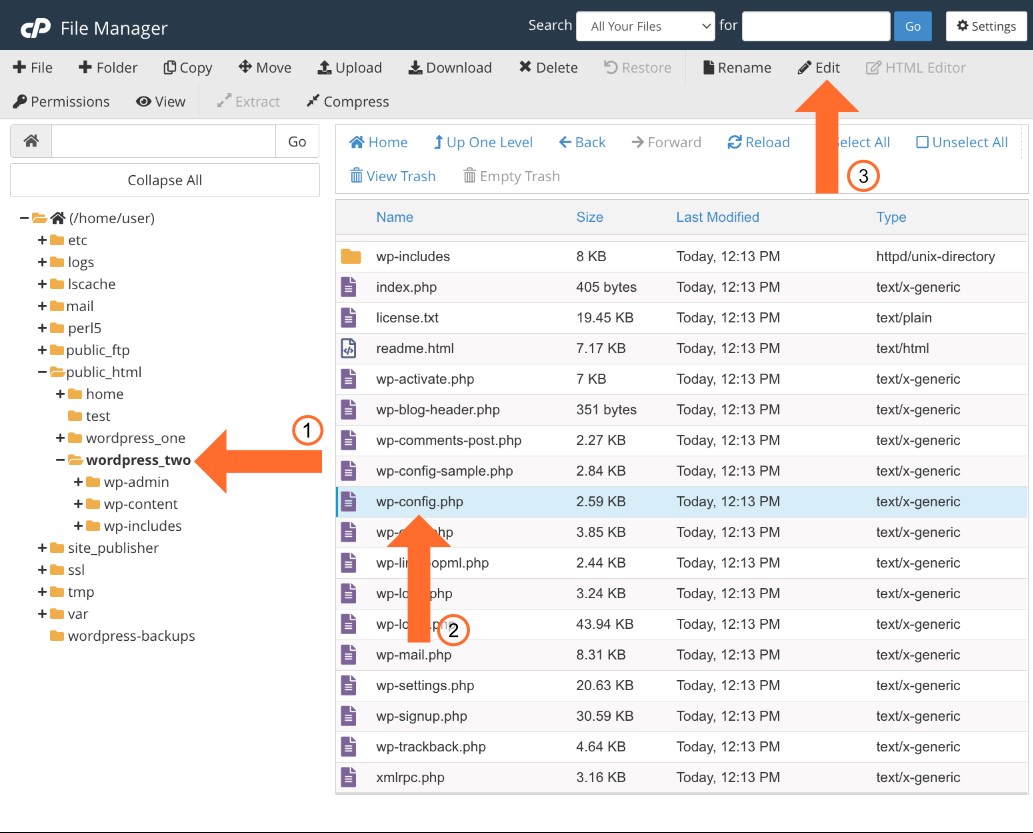
a. Go to File Manager
b. Select new site’s directory
c. Select the wp-config.php file
d. Click edit from toolbar
e. Go to MySQL settings section of wp-config.php
f. Update DB_NAME field with new database’ name
g. Update DB_USER field with the new user created
h. Update DB_PASSWORD field with the new password
i. Save changes

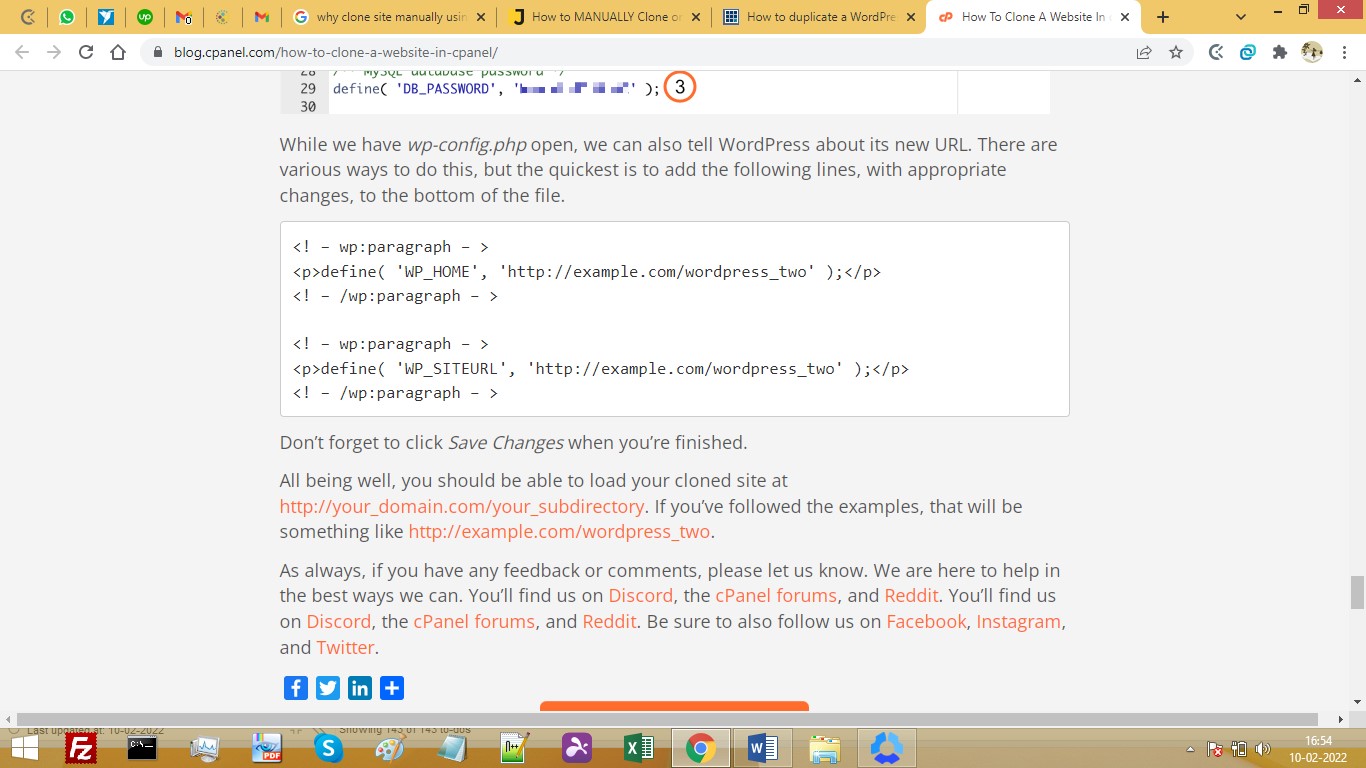
You can also update the new site’s URL from wp-config.php by updating the WP_HOME and WP_SITEURL fields.
Conclusion
So, above are two methods of cloning a site through cPanel. Although the Toolkit method is more convenient, it is specific to WordPress. For other sites, the manual method works, so knowing both is essential.
Frequently Asked Questions (FAQ)
What does it mean to clone a website?
Cloning a website involves creating an exact duplicate, maintaining identical files and database content, and hosting it on a different domain or directory.
Why would I need to clone a website?
Cloning serves various purposes, such as deploying a testing or staging site quickly, replicating a site's basic configuration, and providing designers and developers with a live-like working environment for accurate testing.
Why should I choose cPanel for website cloning?
cPanel offers a user-friendly and efficient platform for website cloning. It automates critical steps, reducing errors and saving time compared to manual methods or command-line tools.
Updated 9 months ago