How to create and manage cPanel accounts in WHM
cPanel is the access door to your website as it allows you to manage applications and files associated with your hosting provider. It is an important feature that web hosting companies provide to customers to access several features.
Your cPanel is like the key to your castle as once you misplace the key, someone else can gain access to it and do whatever they feel. Note that web hosting is different from WordPress hosting because most people confuse the two.
Nowadays, the choice of cPanel host is very critical as choosing a domain name for your business. Therefore, you need to be careful when selecting a web host as customer support, pricing, performance, features, and reliability can affect your website functionality. The cPanel is an integral aspect of a web host as it allows you to manage different aspects of a web server. You can manage email accounts, files, databases, and SSL certificates.
How to create and manage cPanel Account in WHM?
The first step to creating and managing your cPanel account is accessing your cPanel. We assume you have already purchased a host's domain name and hosting plan. To log in to your cPanel to create and manage a cPanel account, you have to access your web host manager.
Step 1 - Login to cPanel
The easiest way to log in to your cPanel is to type your website address, followed by a colon and 2083. For instance, if your website is www.domain123.com, to access your cPanel, you have to type the following www.domain123.com:2083.
This will automatically take you to the login page, where you need to input your username and password sent to your email. If you successfully log in, it will redirect you to your website's control panel, containing all the settings you need.
Step 2 – Creating an account
Once you have access to your website setting, you can click the "Account Functions." The next process is to click on the "Create a New Account."
Step 3 – Fill in the necessary information
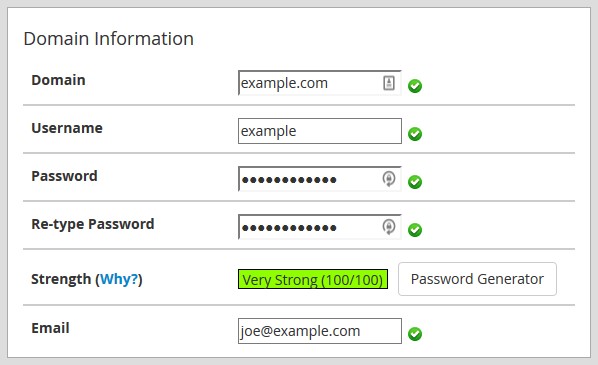
After clicking the "Create a New Account," a new window will open, requesting information such as domain, username, password, and email. Ensure you fill the information in the fields accurately.
The domain name represents the primary name for your cPanel account, whereas the username is the name you want to use when logging into the cPanel. Every username is followed by a password, which you can provide to access the cPanel. However, the email address is where you will receive cPanel notifications.

Step 4 – Select Package
Here, you have to select the desired package of your choice.

Step 5 – select theme
This section allows you to select your preferred language and theme.

Step 6 – Optional setting
The DNS and Mail Routing settings can be left as default, especially if you don't have technical knowledge about web hosting. After this, you can click on the "Click" button. If there were no errors, you would see a message "Account Creation Completed!!!... Account Creation OK…Done"
With these steps, you have completely created a new cPanel account in the web host manager. Now you can manage your account and perform several functions in it.
Advantages of cPanel for website Owners
The cPanel offers website owners several unique features, making it an invaluable tool for business owners looking to promote their products and services online. Here are some benefits of using the cPanel.
User-friendly interface
The carefully designed interface uniquely categorizes different features, enabling users to locate these modules easily. Interestingly, the cPanel interface has an intuitive dashboard with great graphics and menus for seamless navigation throughout the platform. Remarkably, installing and uploading your files to a web host is easy from the cPanel.
Highly compatible
One prominent reason for its popularity is the compatibility with different web browsers, including Mozilla Firefox, Safari, and Google Chrome. In addition, it supports different third-party applications such as SEO tools and site builders.
Extensive features
You don't need advanced technical knowledge to navigate through the dashboard as users can perform complicated tasks, including managing MySQL databases, creating FTP accounts subdomains, and generating website backups.
Reliable support system
The cPanel blogs and forums give you access to several dedicated manuals for WHM and cPanel. These manuals provide in-depth analysis and solutions to several cPanel products.
Application installer
The cPanel grants access to install over 400 applications on your website. It also comes with an integrated Softaculous apps installer that makes the installation process easy.
Wrapping up
The cPanel interface offers many opportunities for web users to manage applications and files on your website. You can install software using Softaculous, create FTP accounts, create email accounts, set up Free AutoSSL, view web traffic data, and create databases and usernames.
Creating and managing a cPanel account involves a straightforward process that is as easy as starting a web hosting business. If you follow our guide on creating a cPanel account, you are now an expert in creating and managing an account in cPanel.
Updated 9 months ago